1 · Install VectorLabel
VectorLabel is a small suite of macOS apps: a background Engine that owns your printers and lives in the menu bar, an Auto Print helper that opens the print window when new data arrives (the Engine keeps it running for you automatically), and two label Designers. The installer sets up all of them.
- Download the latest release from the Downloads page (the
.pkginstaller is easiest). - Run the installer and follow its panes — it installs all four apps.
- Launch VectorLabel Engine. Its icon appears in your menu bar; that icon is your home base. Want it there every time? Turn on Launch at login in Preferences ▸ Advanced ▸ App Behaviour (macOS may ask you to approve it under System Settings ▸ General ▸ Login Items).
- The first time you launch it, a setup screen offers starter (sample) templates and ready-made supply groups — on a fresh install the starter templates come pre-selected, so you can simply click through. Skipped it? Reopen it any time from Preferences ▸ Updates ▸ Set Up Supplies & Templates….
- Plug in your printer by USB (or have its IP address ready for a network printer).
Official releases are signed and notarized and open normally. If macOS ever says an app is from an “unidentified developer”, right-click the app → Open the first time to approve it. Requires macOS 14 (Sonoma) or later on an Apple Silicon Mac; VectorLabel is Mac-only.
Connect your printer
Plug your printer in by USB and it should appear automatically — it shows up with a green status dot in the Engine menu and under Preferences ▸ Printers, ready to print. VectorLabel can also auto-discover printers on your network with a subnet scan. If a printer doesn't appear, or you know its IP address and would rather add it directly, open Preferences:
- Click the menu-bar icon → Preferences… → Printers.
- Click Scan → Scan USB to re-detect a USB printer, or Scan network (subnet) to auto-discover printers on your local network. To add a known network printer directly, type its host / IP, choose the model, and click Add.
- If macOS asks to allow Documents access or notifications, allow them.
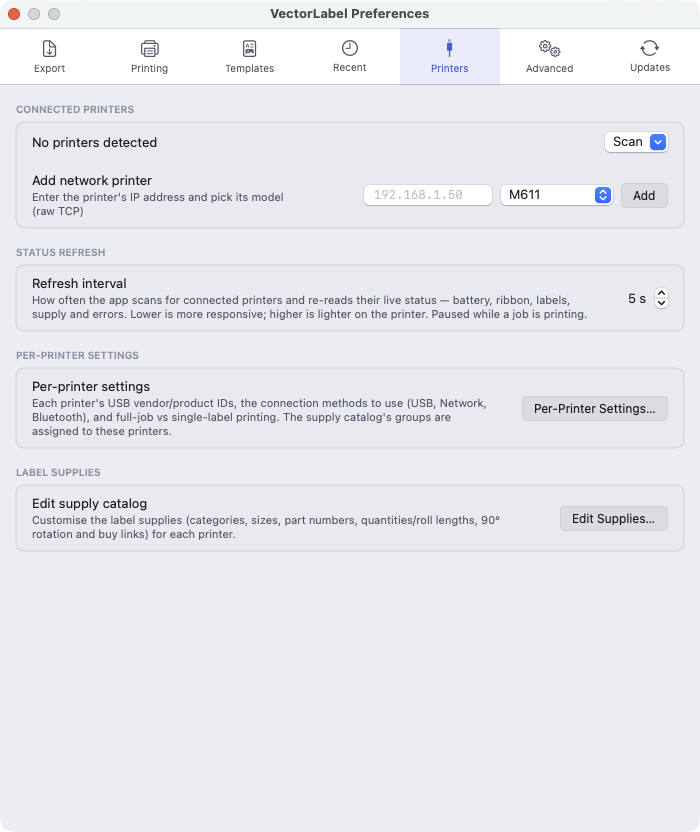
The real Preferences ▸ Printers tab — "Scan" re-detects USB printers or auto-discovers network printers on your subnet, "Add network printer" adds one directly by IP + model, and "Edit Supplies…" opens the supply catalog. Connected printers are listed at the top with a live status dot.
Most-mature path today is a Brady M611 (USB or network) or M610 (USB). Brother P-touch drivers are included but alpha: only the PT-E560BT has been tested on a real unit, and the PT-E550W / PT-P750W haven't been print-tested yet. Cutting is unconfirmed on all three — see the FAQ.
2 · Design a label yourself
No CAD required. Use the Custom Designer for one-off labels (with an optional database mode for batches), or the Template Designer for reusable, data-bound templates.
- Open a designer from the Engine menu (Open Custom Designer / Open Template Designer). The Custom Designer greets you with a start dialog — your recent labels, Browse…, or New blank label.
- Click Supply in the top bar and pick your label stock. The canvas resizes to it. For continuous tape, set a Length or click ⤢ Fit.
- Prefer millimetres? Set Inches or Millimetres in Engine ▸ Preferences ▸ Advanced ▸ Units — it changes the rulers and every dimension field across all the apps (labels are stored the same either way, so it never alters a saved template). You can also type a fraction or the other unit into any size field:
1/8",3mmor even.25"-1/8"auto-convert. - Add objects from the left Add sidebar — Text, Barcode, Image, Symbol, lines and shapes — and edit each in the right-hand properties panel.
- For data-driven labels, set a text or barcode object’s source to a field or a formula (see data binding). In the Custom Designer’s database mode, opening an Excel
.xlsxthat has more than one worksheet asks which tab to use as your print data; single-sheet workbooks and CSV files open straight away. - Save your work with ⌘S (⌘⇧S for Save As), then print from the print window — VectorLabel pre-selects a printer whose loaded supply matches your label (picking another always wins); confirm the supply shows a green ✓, and go.
Brady printers auto-orient your design to fit the loaded cassette, so labels print the right way round. The exception is die-cut stock with a square printable area, where there is nothing for the fit to decide — those supplies carry a Feed rotation setting in Edit Supplies instead (see the guide). Swapped cassettes? Click the ↻ button next to the printer in the Engine’s menu-bar popover to re-read the supply. And if you pause an M611 on the device mid-print, the menu bar shows “Printer paused” until you resume.
Both designers can open a Brady .BWT or Brother .lbx template via Browse…. VectorLabel now matches it to a catalog supply automatically — a Brady label to the Brady M6 group (by part number, then size) and a Brother label to the Brother P-touch tapes (by tape width) — so it comes in correctly sized and oriented. If it can’t confidently match, the supply picker opens showing the imported label’s dimensions so you can choose the right stock.
The real designer — drag text, barcodes and shapes onto a true-to-size canvas, and bind them to your data (shown here with the 1_5x1_5 V1 template).
⌘S save · ⌘⇧S save as · ⌘D duplicate · ⌘C/⌘V copy & paste · Delete remove the selected object.
3 · Print from Vectorworks
If your cable schedule lives in a Vectorworks ConnectCAD drawing, VectorLabel can label every wire with no re-typing. The installer sets up the two ConnectCAD export commands for you.
Add the export commands to Vectorworks (one time)
- During install, tick the optional “Vectorworks ConnectCAD plug-ins” choice — the installer copies the two ready-made commands straight into your Vectorworks Plug-ins folder. No pasting scripts.
- In Vectorworks: Tools → Workspaces → Edit Current Workspace, drag Export Selected Circuits to VectorLabel and Export All Circuits to VectorLabel into a menu, and save.
- Prefer to add them by hand? Paste
export_selected.py/export_all.pyinto two new Python commands in the Plug-in Manager instead.
Export & print
- Make sure VectorLabel is running on your Mac and “Auto-open print window when an export is detected” is on in its Preferences.
- In Vectorworks, save your file (its name becomes the export folder). Select the circuits you want — or switch to the layer you want to label.
- Run Export Selected Circuits (for your selection) or Export All Circuits (for the whole layer). The export is silent — nothing pops up in Vectorworks.
- Switch to your Mac: the print window opens automatically, one row per cable end.
- Pick a template and printer, review/filter the rows, and Print.
The real Print window opens automatically on export — one row per label; pick a template and printer, then Print.
Changed the drawing? Just run the export again — a fresh export is created and the print window reopens with the new data.
You’re set — what next?
That’s the whole loop: get data in, lay out a label, print. When you want the depth:
- User guide — every feature explained: the designer, formulas, barcodes, printers, supplies and calibration.
- Fixing common problems — step-by-step troubleshooting.
- FAQ — quick answers to common questions.